

USER MANUAL - NITRO KAFO 0.5L/ 1L + Cold Brew Glass Jar
🎥 HOW-TO VIDEO
Something unclear in the video or steps below? Leave a comment or email us at feedback@icotrading.com
❄️ PART 1 — COLD BREW PREP
In order to make Nitro Coffee you first need cold brew coffee. Yield = 3 cups of cold brew.

1ADD Ground Coffee

- Add 1 cup (3.5oz) of coarsely ground coffee into the Nitro Brew filter.
- Ensure the filter gasket is placed on the filter correctly.
2ADD Water

- Add 3 to 3.5 cups of water to the mason jar.
3CLOSE and STEEP

- Close tightly and steep in the fridge or on the counter for 12 to 24 hours.
- Ensure the lid gasket is placed correctly.
4REMOVE Filter

- After 12 or 24 hours, remove the Nitro Brew filter and discard the coffee grounds.
5DILUTE the Concentrate
- The result is an intensely flavored coffee concentrate that must be diluted with water.
- We suggest a 50/50 ratio with water — this lowers caffeine content and reduces bitterness.
6STORE Cold Brew
- Store cold brew inside the cold brew mason jar in the fridge for up to 5 days.
7CLEAN the Mason Jar
- Remove the silicon gaskets and place the jar in the dishwasher.
⚠️ Gaskets are NOT dishwasher safe — clean them separately by hand.
☕️ PART 2 — NITRO COFFEE PREP
How to prepare Nitro Coffee using Nitro Kafo 0.5L or 1L:

1ADD Cold Brew
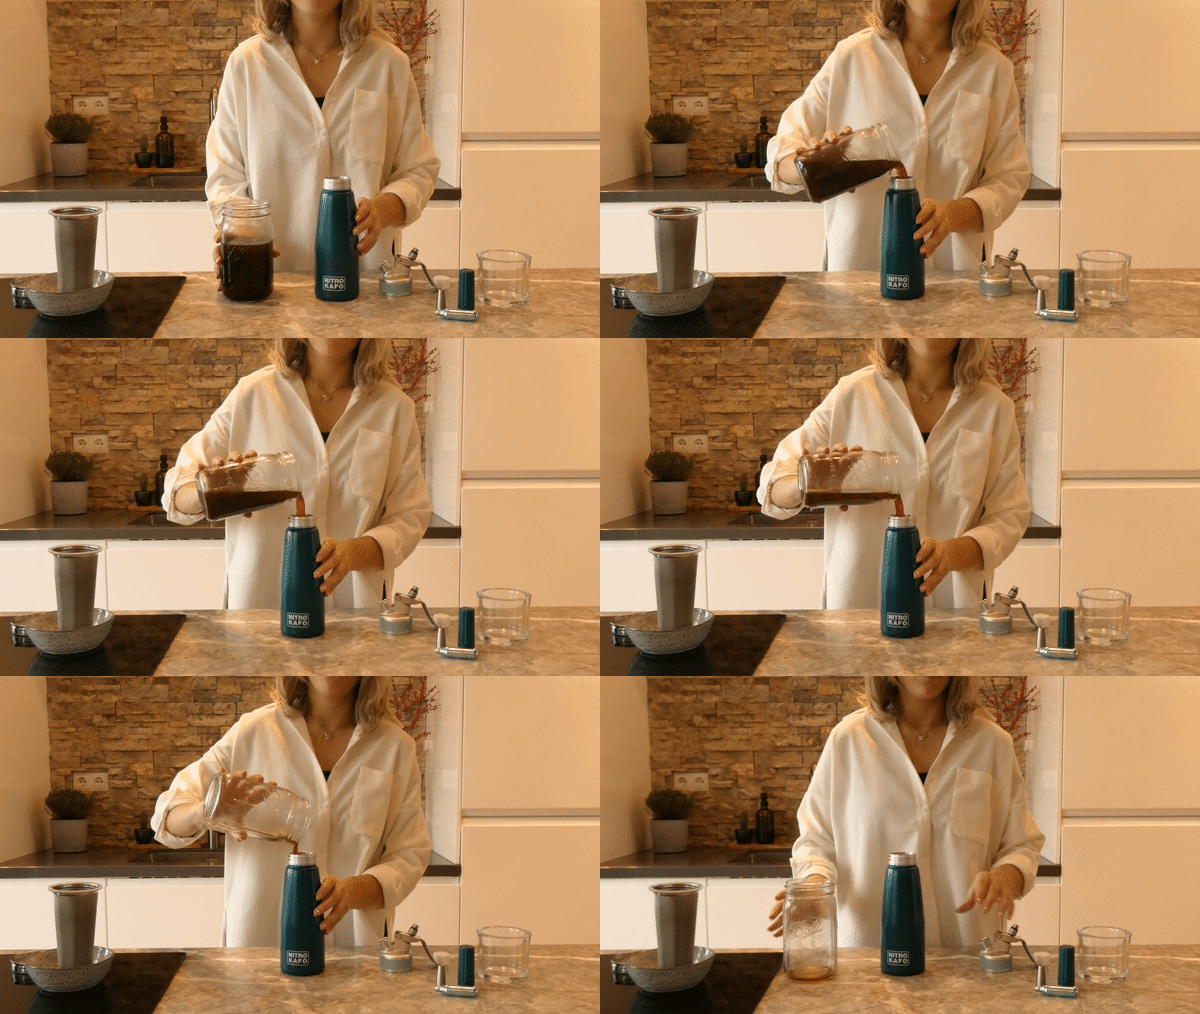
- Add 0.5L / 1 Pint of cold brew to the 0.5L Nitro Kafo, or 1L / 1 Quart to the 1L Nitro Kafo.
- Make sure the cold brew is cold ❄️.
2SECURE Piston and Valve

- The piston and valve must be tightly screwed in place.
3INSERT Silicon Gasket

- The silicon gasket must be inserted tightly into the headset.
4SCREW on Headset

- Screw the headset tightly onto the bottle.
5ATTACH Nitro Nozzle

- Screw the stainless steel Nitro Nozzle onto the headset.
6INSERT N2 Cartridge(s)

- Insert 1 × 2g N2 cartridge into the charger holder and screw on until all contents release into the bottle — you will hear a "sss" sound.
- For the 1L Nitro Kafo: insert 1 or 2 cartridges — check consistency with 1 first.
🚨 DO NOT use N2O chargers instead of N2 chargers — the result will be different.
7UNSCREW Charger Holder

- Unscrew the charger holder and discard the empty cartridge.
- A small amount of gas will escape when unscrewing — this is normal.
⚠️ DO NOT use the device with the charger holder still attached.
8SCREW on Protector Cap

- Screw the protector cap onto the headset.
9SHAKE Nitro Kafo

- Shake Nitro Kafo 5 to 10 times to ensure the gas thoroughly incorporates with the coffee.
10SERVE

- Serve by pressing lightly on the lever.
- Optional: add ice cubes to the coffee 😊
⚠️ DO NOT fully depress the lever — the contents will shoot out with force.
11STORE Nitro Cold Brew
- You may keep your nitro cold brew in the Nitro Kafo for up to 2 weeks in the fridge.
12CLEAN Nitro Kafo
- Remove all parts (nitro diffuser nozzle, valve, piston, and silicon gasket) from the head to clean individually.
- All parts are dishwasher safe!
📧 Contact Us
Questions or need help? Write to us! feedback@icotrading.com
🎥 VIDEO INSTRUCTIVO
¿Algo no está claro en el video o en los pasos? ¡Deja un comentario o escríbenos a feedback@icotrading.com!
❄️ PARTE 1 — PREPARACIÓN DEL COLD BREW
Para preparar Nitro Coffee primero necesitas cold brew. Rendimiento = 3 tazas de cold brew.
1AÑADE el Café Molido
- Añade 1 taza (3.5oz) de café molido grueso en el filtro Nitro Brew.
- Asegúrate de que la junta del filtro esté colocada correctamente.
2AÑADE Agua
- Añade 3 a 3.5 tazas de agua al tarro mason.
3CIERRA y DEJA REPOSAR
- Cierra bien y deja reposar en el frigorífico o en la encimera durante 12 a 24 horas.
- Asegúrate de que la junta de la tapa esté colocada correctamente.
4RETIRA el Filtro
- Después de 12 o 24 horas, retira el filtro Nitro Brew y desecha el café molido.
5DILUYE el Concentrado
- El resultado es un concentrado de café muy intenso que debe diluirse con agua.
- Recomendamos una proporción 50/50 con agua — reduce el contenido de cafeína y la amargura.
6ALMACENA el Cold Brew
- Guarda el cold brew en el tarro mason en el frigorífico hasta 5 días.
7LIMPIA el Tarro Mason
- Retira las juntas de silicona y coloca el tarro en el lavavajillas.
⚠️ Las juntas NO son aptas para lavavajillas — lávalas a mano por separado.
☕️ PARTE 2 — PREPARACIÓN DEL NITRO COFFEE
Cómo preparar Nitro Coffee con el Nitro Kafo 0.5L o 1L:
1AÑADE el Cold Brew
- Añade 0.5L / 1 Pinta de cold brew al Nitro Kafo 0.5L, o 1L / 1 Cuarto al Nitro Kafo 1L.
- Asegúrate de que el cold brew esté frío ❄️.
2ASEGURA el Pistón y la Válvula
- El pistón y la válvula deben estar bien enroscados en su lugar.
3INSERTA la Junta de Silicona
- La junta de silicona debe insertarse firmemente en el cabezal.
4ENROSCA el Cabezal
- Enrosca el cabezal firmemente en la botella.
5COLOCA la Boquilla Nitro
- Enrosca la boquilla Nitro de acero inoxidable en el cabezal.
6INSERTA el/los Cartucho(s) N2
- Inserta 1 × cartucho N2 de 2g en el portacargador y enrosca hasta que todo el contenido se libere en la botella — escucharás un "sss".
- Para el Nitro Kafo 1L: inserta 1 o 2 cartuchos — comprueba la consistencia con 1 primero.
🚨 NO uses cargadores N2O en lugar de N2 — el resultado será diferente.
7DESENROSCA el Portacargador
- Desenrosca el portacargador y desecha el cartucho vacío.
- Una pequeña cantidad de gas escapará al desenroscar — esto es normal.
⚠️ NO uses el dispositivo con el portacargador todavía conectado.
8COLOCA la Tapa Protectora
- Enrosca la tapa protectora en el cabezal.
9AGITA el Nitro Kafo
- Agita el Nitro Kafo 5 a 10 veces para asegurar que el gas se incorpore bien al café.
10SIRVE
- Sirve presionando suavemente la palanca.
- Opcional: añade cubitos de hielo al café 😊
⚠️ NO presiones la palanca completamente — el contenido saldrá con fuerza.
11ALMACENA el Nitro Cold Brew
- Puedes guardar tu nitro cold brew en el Nitro Kafo hasta 2 semanas en el frigorífico.
12LIMPIA el Nitro Kafo
- Retira todas las piezas (boquilla difusora nitro, válvula, pistón y junta de silicona) del cabezal para limpiarlas individualmente.
- ¡Todas las piezas son aptas para lavavajillas!
📧 Contáctenos
¿Preguntas o necesita ayuda? ¡Escríbanos! feedback@icotrading.com